OCR(Optical Character RecognitionまたはReader:光学的文字認識)機能は便利なので、現在では色々なスマホアプリに使われていますね。少し調べてみると、ML Kitを使うことで比較的簡単にOCR機能を実現できそうということで、私も試してみました。
ML Kitって何?
既にご存知の方も多いと思いますが、ML Kitというのは、Googleが提供するAndroid/iOS向けモバイルSDK(Software Development Kit)のことです。
機械学習の知識がなくても、画像処理や自然言語処理などを簡単に実装できるようにするための無料のライブラリです。
OCR以外にも色々使えるということですね。
オフライン環境でも使えるというのもうれしいポイントです。
商用利用も可能ですが、特定の機能やモデルには追加の利用条件が付いたり、Cloudベースの機能と組み合わせる場合は、Google Cloudの料金が発生したりするようなので、詳しく知りたい方はGoogle公式ドキュメントなどを確認してください。
Android Studioで実装
MainActivity.kt
まずはMainActivityの実装から。
カメラ起動
カメラ起動の許可があれば起動します。
|
1 2 3 4 5 6 7 8 9 10 11 12 13 14 15 16 17 18 19 20 21 22 23 24 25 26 27 28 29 30 31 |
private fun startCamera() { val cameraProviderFuture = ProcessCameraProvider.getInstance(this) cameraProviderFuture.addListener({ try { val cameraProvider = cameraProviderFuture.get() val preview = Preview.Builder().build().also { it.surfaceProvider = previewView.surfaceProvider } val imageCaptureInstance = ImageCapture.Builder() .setCaptureMode(ImageCapture.CAPTURE_MODE_MINIMIZE_LATENCY) .build() imageCapture = imageCaptureInstance val cameraSelector = CameraSelector.DEFAULT_BACK_CAMERA cameraProvider.unbindAll() cameraProvider.bindToLifecycle( this, cameraSelector, preview, imageCaptureInstance ) } catch (exc: Exception) { Log.e(TAG, "Use case binding failed", exc) } }, ContextCompat.getMainExecutor(this)) } |
撮影処理
ボタンを押したときに実行する処理です。(imageCaptureインスタンスが存在するとき)
|
1 2 3 4 5 6 7 8 9 10 11 12 13 14 15 16 17 18 |
private var imageCapture: ImageCapture? = null private fun takePhoto() { val capture = imageCapture ?: return capture.takePicture( ContextCompat.getMainExecutor(this), object : ImageCapture.OnImageCapturedCallback() { override fun onCaptureSuccess(image: ImageProxy) { processImage(image) } override fun onError(exception: ImageCaptureException) { txtResult.text = getString(R.string.capture_failed, exception.message) } } ) } |
OCR処理(ML Kit)
今回のメインのOCR部分です。
|
1 2 3 4 5 6 7 8 9 10 11 12 13 14 15 16 17 18 19 20 21 22 23 24 25 26 27 28 |
@OptIn(ExperimentalGetImage::class) private fun processImage(imageProxy: ImageProxy) { val mediaImage = imageProxy.image if (mediaImage == null) { imageProxy.close() return } val inputImage = InputImage.fromMediaImage( mediaImage, imageProxy.imageInfo.rotationDegrees ) val recognizer = TextRecognition.getClient( JapaneseTextRecognizerOptions.Builder().build() ) recognizer.process(inputImage) .addOnSuccessListener { visionText -> txtResult.text = visionText.text } .addOnFailureListener { txtResult.text = getString(R.string.ocr_failed) } .addOnCompleteListener { imageProxy.close() } } |
権限関連
カメラ起動の権限をチェックしたりする部分です。
|
1 2 3 4 5 6 7 8 9 10 11 12 13 14 15 16 17 18 19 20 21 22 23 24 25 26 27 28 29 |
private fun hasCameraPermission(): Boolean { return ContextCompat.checkSelfPermission( this, Manifest.permission.CAMERA ) == PackageManager.PERMISSION_GRANTED } private fun requestCameraPermission() { ActivityCompat.requestPermissions( this, arrayOf(Manifest.permission.CAMERA), REQUEST_CODE_PERMISSIONS ) } override fun onRequestPermissionsResult( requestCode: Int, permissions: Array<out String>, grantResults: IntArray ) { super.onRequestPermissionsResult(requestCode, permissions, grantResults) if (requestCode == REQUEST_CODE_PERMISSIONS && grantResults.isNotEmpty() && grantResults[0] == PackageManager.PERMISSION_GRANTED ) { startCamera() } } |
エントリポイント
エントリポイントをどこにするかはAndroidManifest.xmlで設定します。デフォルトはMainActivityになっていると思いますが、変更したい場合は確認してみてください。
|
1 2 3 4 5 6 7 8 9 10 11 12 13 14 15 16 17 18 19 20 21 22 23 24 25 26 27 28 29 30 |
override fun onCreate(savedInstanceState: Bundle?) { super.onCreate(savedInstanceState) try { setContentView(R.layout.activity_main) } catch (e: Exception) { Log.e(TAG, "Layout inflation failed", e) return } // View初期化 previewView = findViewById(R.id.previewView) btnCapture = findViewById(R.id.btnCapture) txtResult = findViewById(R.id.txtResult) // 権限チェック if (hasCameraPermission()) { startCamera() } else { requestCameraPermission() } // 撮影 → OCR btnCapture.setOnClickListener { if (imageCapture != null) { takePhoto() } else { Toast.makeText(this, "カメラを起動しています...", Toast.LENGTH_SHORT).show() } } } |
定数
class内で1つだけ作れる静的メンバーを定義する箇所です。(static)
|
1 2 3 4 |
companion object { private const val TAG = "MainActivity" private const val REQUEST_CODE_PERMISSIONS = 100 } |
View(コントロール)
layoutで使うViewの変数名です。右側に書かれているのがクラス名です。
|
1 2 3 |
private lateinit var previewView: PreviewView private lateinit var btnCapture: Button private lateinit var txtResult: TextView |
build.gradle.kts
dependenciesにML Kitなどの使用するライブラリを記載します。下記は一例です。
|
1 2 3 4 5 6 7 8 9 10 11 12 13 14 15 16 |
dependencies { ・・・ ・・・ implementation("androidx.appcompat:appcompat:1.6.1") implementation("androidx.constraintlayout:constraintlayout:2.1.4") implementation("androidx.constraintlayout:constraintlayout-compose:1.1.1") implementation("com.google.mlkit:text-recognition:16.0.1") implementation("com.google.mlkit:text-recognition-japanese:16.0.1") val camerax_version = "1.4.1" implementation("androidx.camera:camera-camera2:${camerax_version}") implementation("androidx.camera:camera-lifecycle:${camerax_version}") implementation("androidx.camera:camera-view:${camerax_version}") } |
activity_main.xml
レイアウトも一例です。今回はレイアウトの作成方法については詳しく触れませんが、余力があれば別途記事を作成しようと思います。
|
1 2 3 4 5 6 7 8 9 10 11 12 13 14 15 16 17 18 19 20 21 22 23 24 25 26 27 28 29 30 31 32 33 34 35 36 |
<?xml version="1.0" encoding="utf-8"?> <androidx.constraintlayout.widget.ConstraintLayout xmlns:android="http://schemas.android.com/apk/res/android" xmlns:app="http://schemas.android.com/apk/res-auto" android:layout_width="match_parent" android:layout_height="match_parent"> <androidx.camera.view.PreviewView android:id="@+id/previewView" android:layout_width="0dp" android:layout_height="0dp" app:layout_constraintBottom_toTopOf="@id/btnCapture" app:layout_constraintEnd_toEndOf="parent" app:layout_constraintStart_toStartOf="parent" app:layout_constraintTop_toTopOf="parent" app:layout_constraintVertical_bias="0.0" /> <Button android:id="@+id/btnCapture" android:layout_width="0dp" android:layout_height="wrap_content" android:text="@string/ocr_execute" app:layout_constraintBottom_toTopOf="@id/txtResult" app:layout_constraintEnd_toEndOf="parent" app:layout_constraintHorizontal_bias="1.0" app:layout_constraintStart_toStartOf="parent" /> <TextView android:id="@+id/txtResult" android:layout_width="0dp" android:layout_height="250dp" android:textSize="16sp" app:layout_constraintBottom_toBottomOf="parent" app:layout_constraintEnd_toEndOf="parent" app:layout_constraintStart_toStartOf="parent" /> </androidx.constraintlayout.widget.ConstraintLayout> |
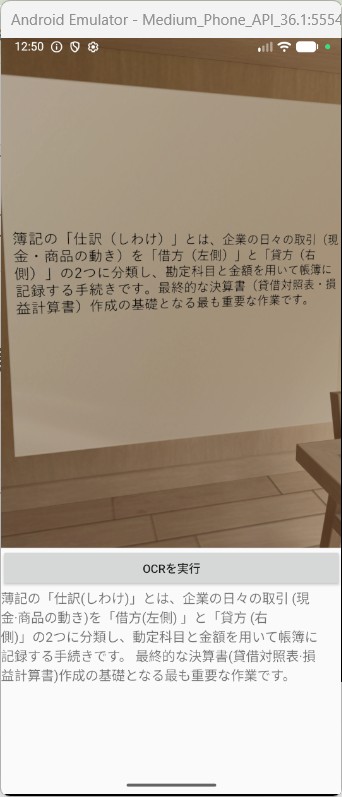
実行結果
エミュレーターで実行した結果です。一応それらしく動いていそうですね。
さいごに
いかがでしたか?
今回はML Kitを使ってOCR機能を実装してみたという内容でした。
私も初めてAndroid Studioを触ったときは、MainActivityってどこ?とかlayoutディレクトリが無いとか、色々苦戦しましたが、Geminiに聞いたりしながら勉強を進めています。
次はもっと実用的な機能と組み合わせてみたいと思っています。
以上、最後まで読んでいただきありがとうございました。